For any professional, email is a fundamental item in their daily routine. Receiving, reading, selecting, replying to, archiving messages is a task that takes time. However, how many of those messages are simply spam? We currently receive an amount of emails, many of them spam, which can seriously compromise our work.
However, there are some resources to solve this problem, facilitate your management and optimize your productivity. This is the case of Gmail filters, as well as other tools to improve your reports offered by Google, which allow you to keep your email inbox organized and which we will review below.
How to create a Gmail filter
Gmail filters allow you to create management parameters for your email inbox. The goal of this is to configure how Gmail will manage your email for you, automating the organization of your inbox.
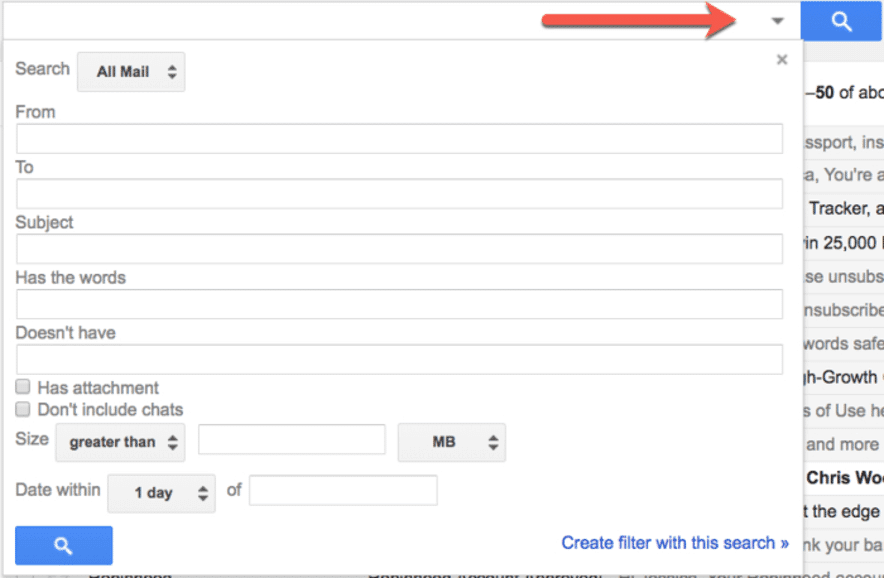
There are different ways to create filters in Gmail. One of them is by clicking the down arrow in the search box:
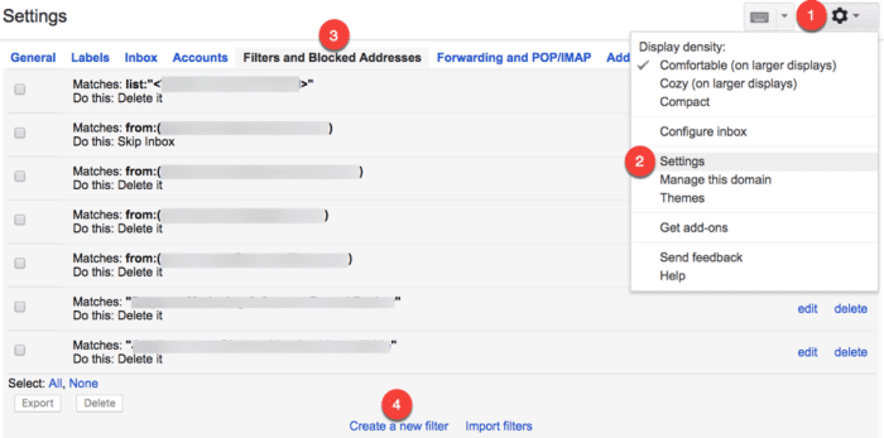
You can also create a new filter from the Gmail settings icon, selecting the “Filters and blocked addresses” tab and then “Create a new filter”.
Another option is to create a filter from a specific email. In that case, you need to open the email, go to the “More” option and select “Filter messages like this”.

It is important to consider that, beyond what we use to create a filter, you can choose between various criteria to filter:
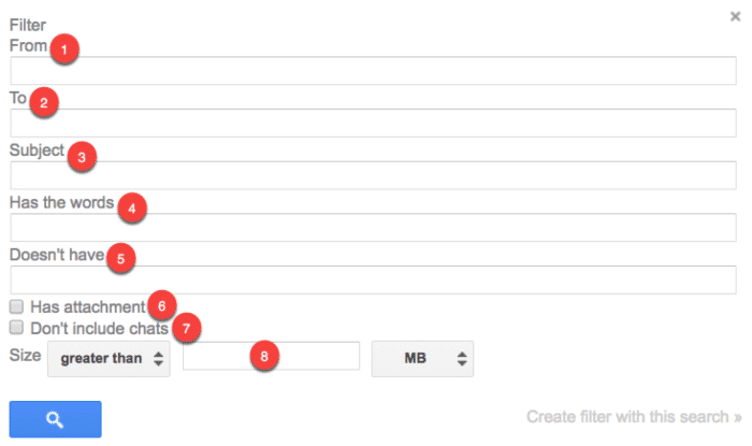
- From: allows you to filter emails sent from a specific address.
- To: filter the emails sent to a specific address.
- Subject: Allows you to filter emails based on what is said in the subject of the message.
- Contains the words: Filter the emails that contain specific keywords.
- Does not contain: Filter emails that do not contain specific keywords.
- Contains attachments: To filter those emails that include attachments.
- Don’t include chats: Allow to ignore Hangouts chats when applying filters.
- Size: Filter the largest or smallest emails within specific ranges.
By using the “More” option to create a filter from a specific email, Gmail allows you to fill in the email address among other options already seen:
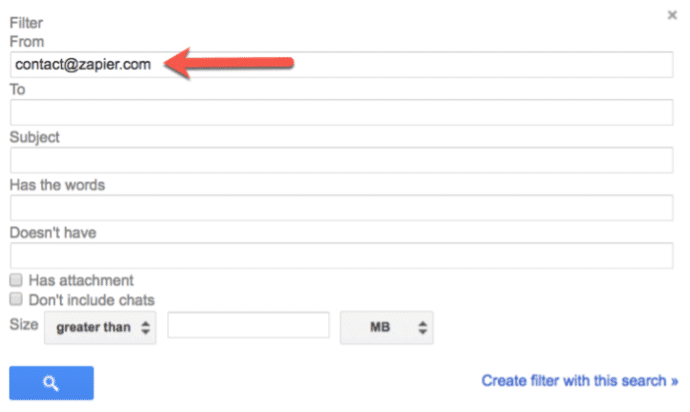
Once you have selected the criteria for your filter based on a specific email, you must use the “Create filter” option to specify what Gmail should do with the emails that match that filter:
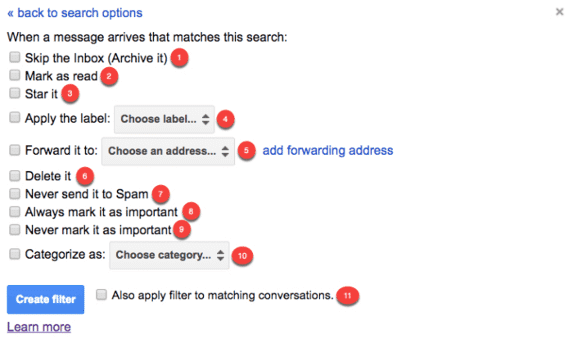
- Bypass the inbox and archive the message without it appearing in your inbox.
- Mark as read, so that the email appears in the inbox as an item already read.
- Automatically highlight the message.
- Apply a specific label to the message.
- Forward the email to a different address automatically.
- Delete an email by sending it to the trash.
- Prevent a message from being marked as spam and sent to the spam tray.
- Always mark the message as important, automatically tagging filtered emails as important.
- Instruct Gmail to never mark a particular email as important.
- Automatically categorize filtered emails.
- Also automatically filter conversations that meet the selected conditions to all emails in your account (new, archived, and deleted) that match the selected filter criteria.
How to edit or delete Gmail filters
Besides generating filters for emails, Gmail allows you to easily edit or delete them when they are not applied correctly or are no longer necessary.
For that, you have to consider the following:
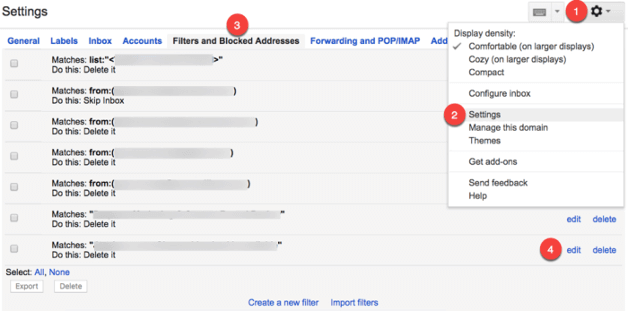
- Go to the settings icon.
- Select the “Settings” option.
- Click on the “Filters and Blocked Addresses” tab.
- Find the filter you want to edit / delete.
- Select “edit” to update the filter’s criteria and behavior, or “delete” to undo it.
Ways to organize the email with Gmail filters
There are various alternatives when you want to create filters to organize your email in Gmail. Here we have some of them:
1. Automatically delete newsletters and marketing email
Tired of receiving emails that are not interesting and take time? With this filter, you can include keywords for Gmail to detect in the body of a message and send it directly to the trash.
- Click the down arrow in the Gmail search bar to open the filter creation form.
- In the “contains the words” field, type “unsubscribe”.
- Click the “Create filter with this search” link.
- Check the “Delete” box.
- Click the “Create filter” button.
Any email that contains the expression “unsubscribe” will be automatically sent to the trash. This option can be used with any expression or keyword that contains a message. Gmail will automatically delete all emails that use one of the keywords or phrases that you have selected in your filters. You only have 30 days to get your deleted items back from the Trash before they are permanently removed.
2. Automatically archive all the newsletters and marketing emails
If the above filter raises the concern of unintentionally deleting something important, this option is more secure, since it automatically archives bulletins messages by following the instructions below:
1. Click the down arrow in the Gmail search bar.
2. In the “contains the words” field, type “unsubscribe”.
3. Click the “Create filter” link.
4. Check the box next to “Skip Received (Archive).”
5. Click the “Create filter” button.
This filter sends all emails that include “unsubscribe” to the “All” folder. You won’t see them in your inbox, but you can access them in another folder.
3. Move newsletters and marketing emails to a specific location
There are emails that you are interested in reading, but you don’t want them to clog your inbox. For those cases, you can create a filter that sends them to a pending tasks location. How to do it?
Scrolling down the main menu, you will see the “Create New Tag” link.
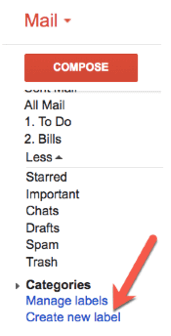
Click to assign a name to a new tag, and then you select “Create”.
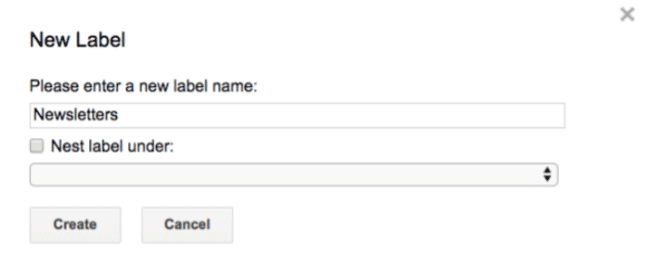
Once your label is created, you create the filter so that the messages you want are directed to it automatically, following the instructions already mentioned. The difference is that here you must select the option “Apply label” and look for it in the drop-down menu. Gmail will automatically send all the emails you have filtered to the respective label for you to review when you have time.
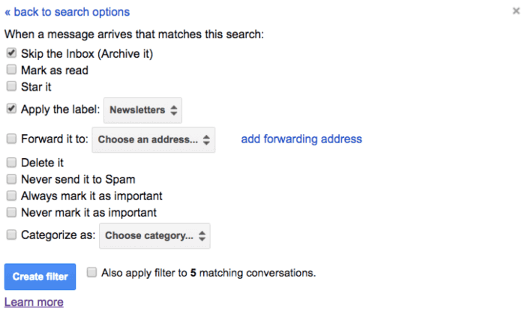
4. Delete, archive or move email from specific senders
Gmail also allows you to generate filters to delete emails from specific senders:
1. By email address
Enter the email address of the sender you want to filter in the “From” field of the label creation form. Then determine the action to take (delete, archive or tag).

2. By email domain
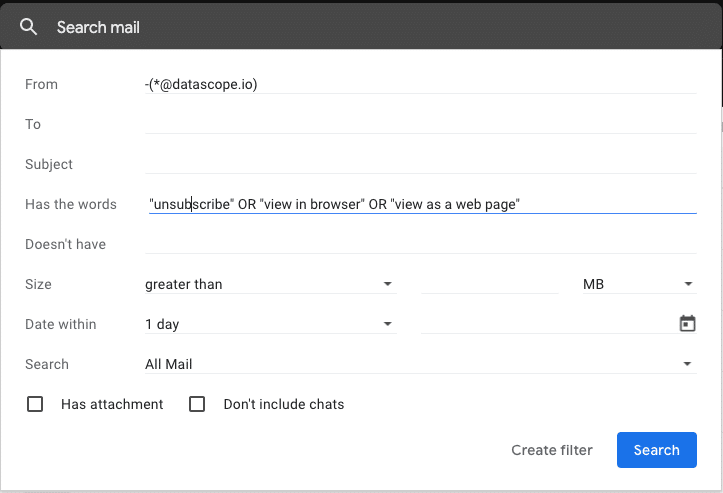
If you want to automatically delete, archive, or tag emails from all senders from a specific domain or company, type an asterisk before the @ symbol to indicate the filter to Gmail.

. Exclude senders from bulk filters
There may be cases where you need to keep unfiltered some mail from a specific company that you are going to remove from your inbox. In that case, in the “From” field of the form you must include the symbol – followed by the exclusive term that was already described in the previous point.
5. Create independent inboxes for different email accounts.
Do you manage multiple email accounts from one central account? If this is your case, and you want the emails sent to each address to appear in separate inboxes, do the following:
- Create a label for each account.
- Open the filter creation form.
- Enter the email address of your first account in the “To” field.
- Click “Create filter”.
- Check the boxes “Skip received (Archive it) and” Apply label “, selecting the appropriate label from the drop-down menu.
- Click the “Create filter” button.
- Repeat these steps for each additional account.
6. Automatically empty the spam folder
In order for the spam tray to become saturated and Gmail can automatically and permanently delete each email that is identified as spam, you must do the following:
1. Click the down arrow in the Gmail search bar.
2. Fill in the “Contains the words” field with the word “spam”.
3. Click the “Create filter” link.
4. Check the “Delete” box.
5. Click on “Create filter”.
7. Create a list of pending tasks
Gmail can also work through filters to organize emails sent by anyone that include tasks that you need to do. It can even be part of the list of tips that a company should follow to strengthen the automation of certain tasks. It is very useful for work environments, where colleagues or bosses exchange messages where you receive instructions or have to carry out important tasks. How to configure it?
1. Create a pending tasks tag, if you haven’t already.
2. Click the down arrow in the Gmail search bar.
3. In the “From” field, enter the email address (es).
4. Click the “Create filter” link.
5. Check the “Skip Received (Archive)” box.
6. Check the “Apply label” box and use the drop-down menu to select the pending tasks label.
The resources that Gmail offers to organize your email inbox aim at one thing: simplify and optimize the time you spend reviewing your messages. In the working world, as well as in life, time is a fundamental factor and we must always consider it. Checking emails is an essential topic, but to be efficient, it is not enough to read everything. It is necessary to systematize, take advantage of technology so that it does the work and your day is increasingly productive.


